0%

今天配置环境变量的时候,因为失误不小心让zsh整个失效了,

1
zsh: command not found:xxx

补救办法,在命令行输入

1
PATH=/bin:/usr/bin:/usr/local/bin:${PATH}

恢复正常

失误的地方在于配置flutter时路径少输入一个$符号,在$HOME/.zshrc文件中

1
2
3
4
5
//正确
export PATH="$PATH:[PATH_TO_FLUTTER_GIT_DIRECTORY]/flutter/bin"
//错误
export PATH="PATH:[PATH_TO_FLUTTER_GIT_DIRECTORY]/flutter/bin"
//注意 PATH_TO_FLUTTER_GIT_DIRECTORY 是需要输入全路径的,/User/xxx/xxx,不是~符号!

最后一个坑,android studio无法加载应用市场插件,乖乖下载安装包从零开始安装便不会出现问题,不能从别的电脑直接拖过来直接用.

LRU cache stand for Least Recently Used Cache,which evict least recently used entry.As Cache purpose is to provide fast and efficient way of retrieving data, it need to meet certain requirement.

Some of the Requirement are

  • fixed size:cache need to have some bounds to limit memory usages.
  • Fast Access:Cache Inert and lookup operation should be fast, preferably O(1) time
  • Replacement of Entry in case,Memory Limit is reached:A cache shoule have efficient algorithm to evict when memory is full.

In case of LRU cache we evict least recently used entry so we have to keep track of recently used entries, entries which have not been used from long time and which have been used recently, plus lookup and insertion operation should be fast enough .

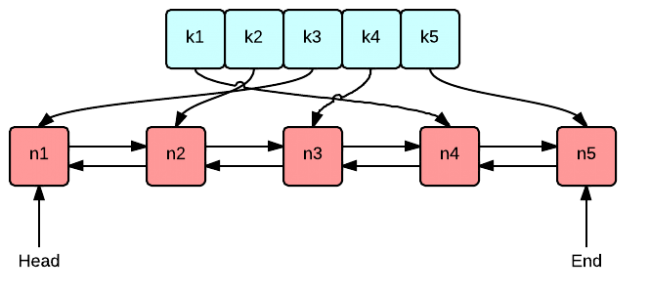
When we think about O(1) lookup, obvious data structure comes in our mind is HashMap.HashMap provide O(1) insertion and lookup,but HashMap does not has mechanism of tracking which entry has been queried recently and which not.

To track this we require another data-structure which provide fast insertion ,deletion and updation,in case of LRU we use Doubly Linkedlist.Reason for choosing doubly LinkList is O(1) deletion,updation and insertion if we have the address of Node on which this operation has to perform

So our Implementation of LRU cache will have HashMap and Doubly LinkedList.In which HashMap will hold the keys and address of the Nodes of Doubly LinkedList.And Doubly LinkedList will hold the values of keys.

As we need to keep track of Recently used entries,we will use a clever approach.We will remove element from bottom and add element on start of LinkedList and whenever any entries is accessed,it will be moved to top.so that recently used entries will be on Top and Least used will be on Bottom.
image

Let implementation the LRU Cache

1
2
3
4
5
6
7
8
9
10
11
12
13
14
15
16
17
18
19
20
21
22
23
24
25
26
27
28
29
30
31
32
33
34
35
36
37
38
39
40
41
42
43
44
45
46
47
48
49
50
51
52
53
54
55
56
57
58
59
60
61
62
63
64
65
66
67
68
69
70
71
72
73
74
75
76
77
78
79
80
81
82
83
84
85
86
87
88
89
90
91
92
93
94
95
96
97
98
99
package com.learning;

/* package whatever; // don't place package name! */

import java.util.HashMap;
class Entry {
int value;
int key;
Entry left;
Entry right;
}
public class LRUCache {

HashMap<Integer, Entry> hashmap;
Entry start, end;
int LRU_SIZE = 4; // Here i am setting 4 to test the LRU cache
// implementation, it can make be dynamic
public LRUCache() {
hashmap = new HashMap<Integer, Entry>();
}

public int getEntry(int key) {
if (hashmap.containsKey(key)) // Key Already Exist, just update the
{
Entry entry = hashmap.get(key);
removeNode(entry);
addAtTop(entry);
return entry.value;
}
return -1;
}

public void putEntry(int key, int value) {
if (hashmap.containsKey(key)) // Key Already Exist, just update the value and move it to top
{
Entry entry = hashmap.get(key);
entry.value = value;
removeNode(entry);
addAtTop(entry);
} else {
Entry newnode = new Entry();
newnode.left = null;
newnode.right = null;
newnode.value = value;
newnode.key = key;
if (hashmap.size() > LRU_SIZE) // We have reached maxium size so need to make room for new element.
{
hashmap.remove(end.key);
removeNode(end);
addAtTop(newnode);

} else {
addAtTop(newnode);
}

hashmap.put(key, newnode);
}
}
public void addAtTop(Entry node) {
node.right = start;
node.left = null;
if (start != null)
start.left = node;
start = node;
if (end == null)
end = start;
}

public void removeNode(Entry node) {

if (node.left != null) {
node.left.right = node.right;
} else {
start = node.right;
}

if (node.right != null) {
node.right.left = node.left;
} else {
end = node.left;
}
}
public static void main(String[] args) throws java.lang.Exception {
// your code goes here
LRUCache lrucache = new LRUCache();
lrucache.putEntry(1, 1);
lrucache.putEntry(10, 15);
lrucache.putEntry(15, 10);
lrucache.putEntry(10, 16);
lrucache.putEntry(12, 15);
lrucache.putEntry(18, 10);
lrucache.putEntry(13, 16);

System.out.println(lrucache.getEntry(1));
System.out.println(lrucache.getEntry(10));
System.out.println(lrucache.getEntry(15));

}
}

I hope code and tutorial is self explanatory.

来源:https://medium.com/@krishankantsinghal/my-first-blog-on-medium-583159139237

总结:最近最少使用算法,内存有限制,查找得快,删除得快,插入也得快

  • 获取缓存

    根据key从字典查找,如果存在,返回值,双向链表删除当前值,插入到最顶端

  • 插入缓存

    1. 如果已经存在,更新值,并移动到链表顶端
    2. 不存在,生成一个新的节点,插入到顶端,如果满了,删除最后一个

1
2
3
4
5
6
7
8
9
10
11
12
13
14
15
16
17
18
19
20
body:   CustomScrollView(
slivers: <Widget>[

SliverGrid.count(
//具体的配置
),


//列表
SliverFixedExtentList(
delegate: SliverChildBuilderDelegate(
(context, index) => ConversationListItem(
delegate: this, conversation: conList[index]
),
childCount: conList.length,
),
itemExtent: 100,
),
],
),

解析:大的容器叫做custom scroll view,子控件叫做slivers,是一个数组,在数组里面从上到下排布sliver控件,有sliver grid,有sliver fixed extent list

  • 效果大概长这样image

在ios中,通常用block或者代理去实现,在flutter中,外部实现一个方法,把这个方法传给按钮,按钮内部用callback接受,ontap方法调用即可,实现如下

1
2
3
4
5
6
7
8
9
10
11
12
13
14
15
16
17
18
19
20
21
22
23
24
25
26
import 'package:flutter/cupertino.dart';
import 'package:flutter/material.dart';

//定义函数类型
typedef StringValue = void Function(String);

class ImageBtn extends StatelessWidget {
//作为属性
StringValue callback;

ImageBtn({Key key,this.callback}) : super(key: key);

@override
Widget build(BuildContext context) {

return new GestureDetector(
onTap: () {
print('MyButton was tappedq!');
//调用
this.callback("testString");
},
child: ...
),
);
}
}

外部使用方法

1
2
3
4
5
6
7
8
9
10
11
//顶部按钮点击事件
void _ontap(String name){
print(name);
}
//实例对象时传进去
ImageBtn(callback:_ontap)

//另外一种写法,不传参数也可以,仅仅是invoke外部函数,
ImageBtn(callback:(){
//do sth...
})

注意:callback和外部的方法,参数类型要保持一致
总结:外部函数传给按钮,让按钮内部可以调用,通过无参数函数调用有参数也可以

1
2
3
4
5
6
7
8
9
10
11
12
13
14
15
Column(
children: <Widget>[
Expanded(child:
Image.asset('assets/images/$imageName.png')
),

Text(
this.model.title,
style: TextStyle(
fontSize: 15,
color: Colors.white,
),
),
],
),

注解:

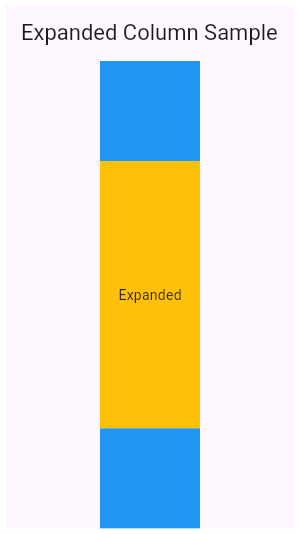
  • column是一个垂直的容器,子控件放在children里面
  • 要想让图片居中,需要放在expanded容器里面,官方定义:expanded is a widget that expands a child of a row,column,or flex so that the child fills the available space.
  • image

1
ModalRoute.of(context).isCurrent

解析:由于页面的组合都是由路由管理的,所以把当前的context传给路由,让路由去判断是否在最顶端,这个路由叫做模态路由

image
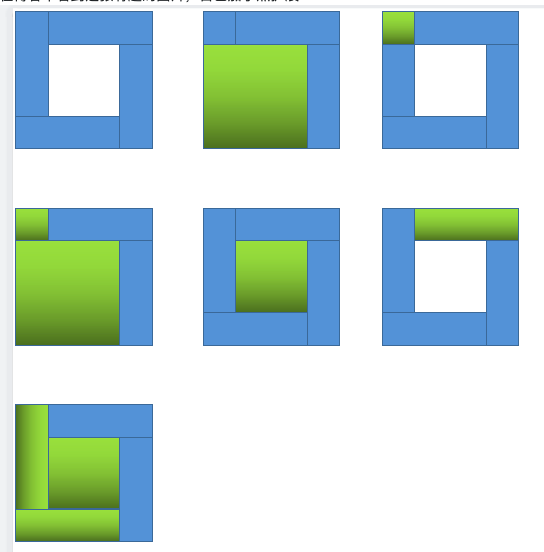
在博客中看到这张有趣的图片,自己加了点扩展
image
自动证明了

  • (a+b)^2 = a^2 + 2ab + b^2
  • (a-b)^2 = a^2 - 2ab + b^2

原因:点击本身出发一次监听,随之产生的动画效果再次出发监听,如果是滑动,仅触发一次监听
解决:看下点击的索引和动画值对不对,过滤掉点击的listen,只显示动画的listen

1
2
3
4
5
6
7
_tabController.addListener(() {
if(_tabController.index == _tabController.animation.value){
int index = _tabController.index;
print("====================当前点击了$index===============");
}

});

代码拿过来自己分析一遍会记得牢。

延迟加载

1
2
3
4
//延迟1秒加载
Future.delayed(Duration(seconds: 1), (){
//do sth
});

使用场景:

同时执行toast和导航栏页面切换,会导致卡顿,可用延迟其中一个方法,避免同时执行

  • 线性渐变
  • 开始位置
  • 结束位置
  • 开始结束点
  • 颜色
    1
    2
    3
    4
    5
    6
    7
    LinearGradient(      //渐变位置
    begin: Alignment.topLeft, //左上
    end: Alignment.bottomRight, //右下
    stops: [0.0, 1.0], //[渐变起始点, 渐变结束点]
    //渐变颜色[始点颜色, 结束颜色]
    colors: [Color.fromRGBO(253, 1, 129, 1), Color.fromRGBO(206, 21, 240, 1)]
    )